How to start making GDExtensions for Godot
Summary
A brief tutorial covering project structure, code, build process and debugging native Godot 4 extensions.
Table of contents
Introduction
This article is not meant for a complete beginner since it delves a bit deeper into the realm of C++ and its tooling. I’d love to make an article that covers more of that part too but currently time is a luxury I don’t have with busy life and all.
Author's Note
I usually create and test lots of things and play around with different engines, libraries and so on. When I began testing GDExtensions I didn’t find any proper tutorials on the subject. I thought I’d create this article since there is always a possibility that my time spent on GDExtensions might not yield any actual releasable “stuff”. At least now with this article the knowledge gained from that time might help others — hopefully You my dear reader.
Article was created using Windows as a development platform but can be adjusted for other platforms too. Enough pleas and I might create Linux and Mac versions but no promises especially since I don’t own a Mac 😅
One must have working C++ compiler tool chain up and running in order to actually build the project. I personally use Visual Studio 2022 Community and its C++ compiler/Environment.
Some versions used in the article :
- Visual Studio 2022 Community
- CMake 3.24.2
- Godot 4.0 beta 4
At the end of the article You can find the repository to clone/copy/fork so You don’t have to start from scratch.
What are GDExtensions?
Introductory blog post Introducing GDNative’s successor, GDExtension defines GDExtension as following :
GDExtension is a new implementation of the GDNative layer that allows the creation of compiled plugins for the engine. At its core, GDExtension is a C API that enables registration of classes implemented within a dynamic library. (Bastiaan Olij)
Author's Note
I started to use Godot while the version 4.0 beta 1 was released so I cannot directly compare the GDNative and GDExtension. The main difference is that while GDNative extensions are compiled directly into the engine, GDExtension live outside as dynamic modules — like the quotation above states. This point alone brings huge development workflow benefits.
GDExtensions are intended for extending the engine using other means than those provided with the engine — like GDScript or C# depending on your Godot flavor. These extensions can provide game specific entities (those that inherit from RefCounted, Objects, Nodes and so on) or larger features (such as new scripting languages). The API is pretty low level and because of that it enables broader extending than the scripting side. It is indeed a versatile tool in your arsenal but it is not as easy to use as GDScript. This is because while the API is indeed lower level it usually means that the language used to create GDExtensions is lower level too and does not provide higher level language features such as asynchronous programming. While any low lever language that is compatible with Godot C ABI can be used this article focuses mainly on C++ because of the godot-cpp project we will get into further in the article.
You presumably can write a whole game in GDExtensions but I’m not entirely sure that is wise just because of the asynchronous possibilities GDScript provides and scripting languages are just faster to code with compared to compiled code which include added build times. Main advantage of lower level languages such as C++ is performance.
Author's Note
Personally I don’t like GDScript that much (maybe someday I’ll write why, hint: I’m somewhat of a language purist) and prefer to write the majority of the game in C/C++ (crazy I know!) but I still leave things to GDScript where it’s a better fit. Mix and match, use the right tool for the right job!
Fresh GDExtension
Let’s create a folder structure that can easily handle multiple separate GDExtensions if needed and the actual Godot project that uses them.
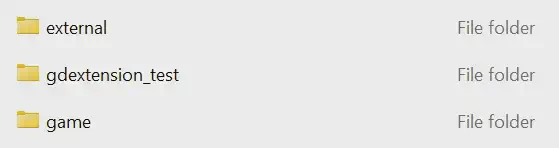
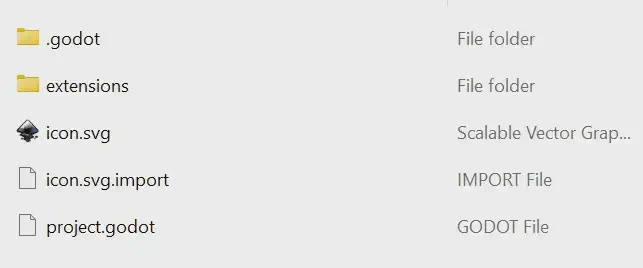
The root of the project will look like this :
This is a good place to create the repository for the project if you plan to use one. Initialize it by running the following command in the root folder :
1git init .Author's Note
This structure is not required for any of the things to actually work. To my knowledge this kind of structure is not some general convention either. I have found it to work for me but you have your own ways of working that does not need to adhere to the way presented here. So please, modify and adapt these to work for You, not the other way around. Besides, I’m making changes all the time trying to find the-best-workflow-ever™️ without honestly achieving that goal…
Let’s go through each of the folders one by one and explain what is their function.
Folder “external”
This folder will contain all that is “external” from the project view point. These external things (for the lack of a better word) should be things that are shared by project parts that are within the root, next to the “external” folder. This is because the other project parts that reside under the root can have their own external dependencies that are not shared and are unique to those parts only.
The most important thing here for the sake of this article is a library that we can use to code GDExtensions with C++ and that is called godot-cpp.
Author's Note
You can download a snapshot of the current state of that library repository but I highly recommend You create a Git repository for the project like above and add godot-cpp as a submodule to that project. This way Git will handle the submodule dependency (and other possible dependencies) as well as your main project containing custom GDExtensions and the actual Godot project.
To add git submodule, after initializing Git repository to the project root, go to the “external” folder and type the following:
1git submodule add https://github.com/godotengine/godot-cpp.git godot-cppNote that if You clone Your project to empty folder at some point in the future submodules might not “pull” automatically. To pull them just run the following command in the project root :
1git pull --recurse-submodulesThe godot-cpp library itself is what it says on the tin. One can generate whole engine binding specifications from the Godot engine as a JSON file and from that file one can generate language specific bindings. The godot-cpp library is language specific bindings for C++ and it is an official project under the Godot engine. There are community provided language bindings for other languages such as Rust and Go but we will go with the official bindings for now.
Author's Note
I’d love to use Rust with Godot at some point though.
So now the external folder should look like this :

And inside the “godot-cpp” folder it should look something like this :
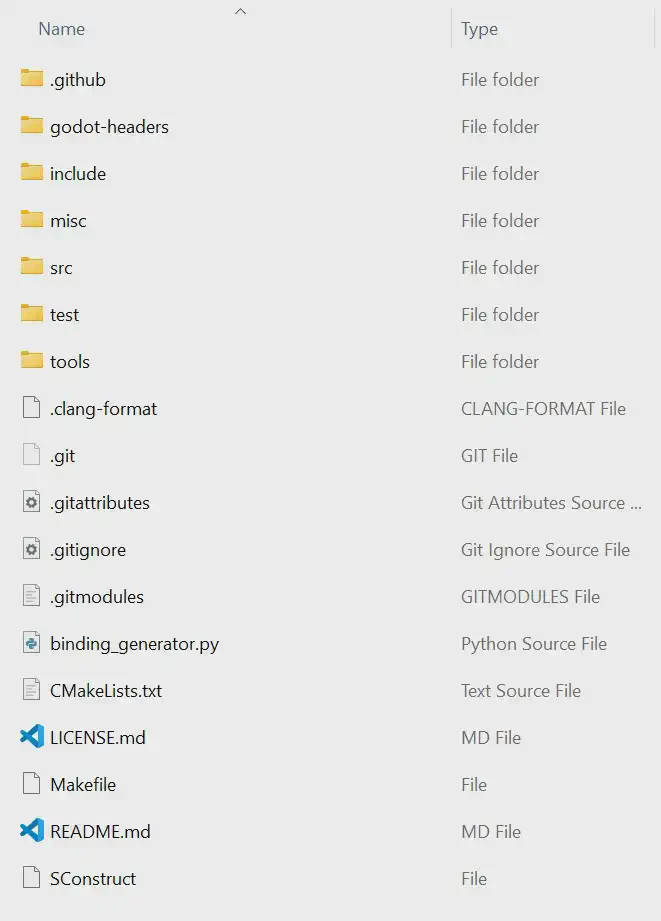
And this is all that is needed for this exercise as our “external” dependencies.
Folder “game”
Let’s create a Godot project inside the “game” folder. Renderer type does matter here, pick what ever suits your project best. I usually select “Git” in the “Version Control Metadata”.
Author's Note
I usually just write something boring such as “Client” or “Game” as the Godot project name since at the root level I almost always use random project name that is not name of the final product. This is because when I’m prototyping the final name can change multiple times during the project.
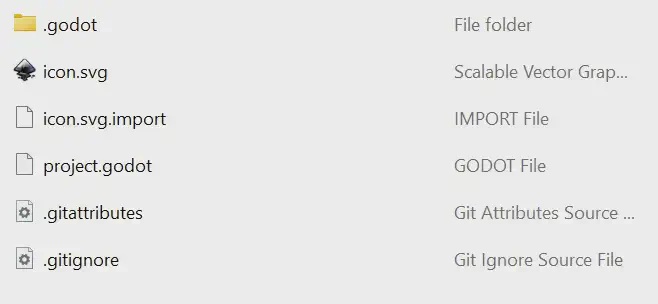
The “game” folder contents now :
Author's Note
If you chose “Git” in “Version Control Metadata” it will create a default .gitignore and .gitattributes files inside the folder that we can merge (or just move) to the root of the project to ignore all the unnecessary bits from version control.
Oh, and you should add build directory to your .gitignore to prevent all intermediate build related stuff from leaking into the repository. My .gitignore is like this:
1out
2.vs
3*.gdextension
4*.dll
5# Godot 4+ specific ignores
6.godot/
Then create “extensions” folder under game resources, here we will put the created GDExtension.
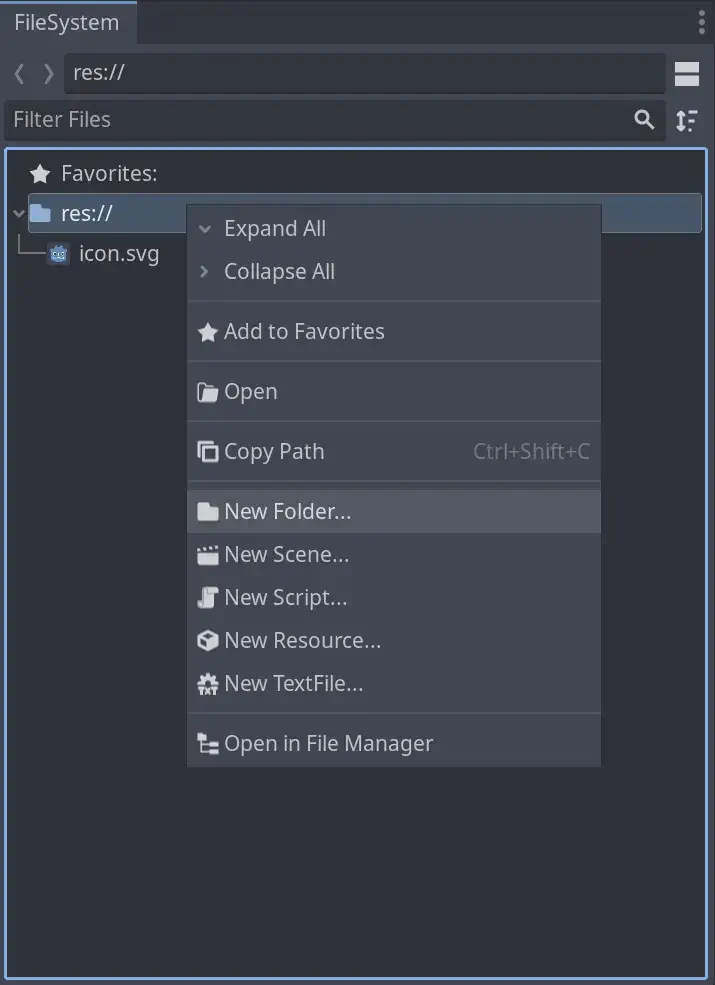
Now the folder structure inside the game should look something like this :
You can shut down Godot for now.
Folder “gdextension_test”
This is the meat of our GDExtension. Here lies the code for the extension we plan to create and the means to build it. First lets start with the structure of our extension folder :
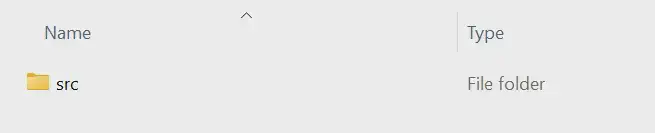
It will only contain one folder. We could put header files into separate “include” folder but this convention is usually used for shared and reusable libraries which are included in other external source files — You could think godot-cpp as this kind of library and it indeed has an separate “include” folder other projects can include files from. Our GDExtension will have headers but it is not meant to be shared as such and nobody other than us will include the headers we create. The extension, a dynamic library, is linked to Godot by the C ABI it defines (lowest level interface Godot provides can be found in the official godot-headers project). If this is foreign concept I suggest reading up on private and public headers.
If You wish to include this project in other C++ projects though then of course by all means, create a separate “include” folder.
Author's Note
I have tried to comment all the code related things in the code and not in the article. When and if you copy-paste the code to your project, and in the future don’t remember where to find the article you can still have the needed information in front of you. And it is a good to practice to comment the code…
I’m using Visual Studio 2022 Community as an IDE. Previously I tried to use the Visual Studio Code as my primary IDE but debugging with Visual Studio compiler was too much of a hassle so I switched. If you plan to use MinGW or Clang as a compiler you might have better luck. You can download Visual Studio 2022 Community here. Note that if you work in professional environment, please read the license whether you are qualified to use it or do you need an actual bought license.
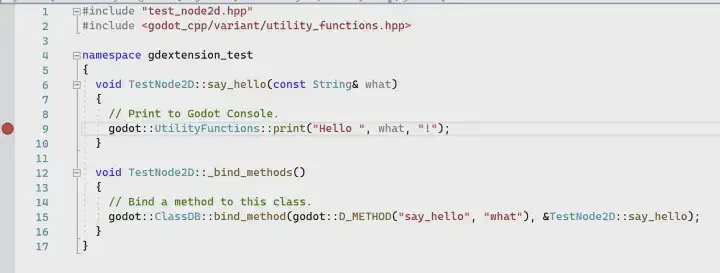
Now, let’s create our custom TestNode2D, put these files in the “src” folder :
 1#include "test_node2d.hpp"
 2#include <godot_cpp/variant/utility_functions.hpp>
 3
 4namespace gdextension_test
 5{
 6  void TestNode2D::say_hello(const String& what)
 7  {
 8    // Print to Godot Console.
 9    godot::UtilityFunctions::print("Hello ", what, "!");
10  }
11
12  void TestNode2D::_bind_methods()
13  {
14    // Bind a method to this class.
15    godot::ClassDB::bind_method(godot::D_METHOD("say_hello", "what"), &TestNode2D::say_hello);
16  }
17}
test_node2d.cpp
 1#ifndef GDEXTENSIONTEST_TEST_NODE2D_HPP
 2#define GDEXTENSIONTEST_TEST_NODE2D_HPP
 3
 4#include <godot_cpp/variant/string.hpp>
 5#include <godot_cpp/classes/node2d.hpp>
 6
 7namespace gdextension_test
 8{
 9  // Although maybe not the best practise if you follow C++ conventions to the letter, but this is easier
10  // at least on the beta phase where API changes constantly.
11  using namespace godot;
12
13  class TestNode2D : public Node2D
14  {
15    // Macro "magic" to reduce boiler plate and introduce
16    // our class to Godot and tell from which kind of class it was inherited from.
17    GDCLASS(TestNode2D, Node2D)
18
19  protected:
20    // Required entry point that the API calls to bind our class to Godot.
21    static void _bind_methods();
22
23  public:
24    // Our small test method, implementation in cpp file.
25    virtual void say_hello(const String& what);
26  };
27
28} // namespace GDExtensionTest
29
30#endif // GDEXTENSIONTEST_TEST_NODE2D_HPP
test_node2d.hpp
We won’t be doing anything fancy in the actual Godot extension and I will be leaving that to you. The C++ bindings should have almost all(?) functions and classes exposed just like in GDScript and even more. The official documentation might not have everything commented but You can read the actual engine code since it is open source and readily available.
Author's Note
In my opinion, the engine code is clean enough to see what is happening and why. One of the things that I love about Godot is the quality and cleanness of the code.
Next we have to have the proper “entry point” for the GDExtension for Godot to initialize and load into the running engine instance.
Let’s create that in the same “src” folder :
 1#include <godot/gdnative_interface.h>
 2#include <godot_cpp/core/class_db.hpp>
 3#include <godot_cpp/godot.hpp>
 4
 5// Include our class header.
 6#include "test_node2d.hpp"
 7
 8// This function will be called to initialize types and other things the extension provides.
 9// It can be called multiple times, since the only the minimum initialization level is provided (see below the main entry point.)
10void initializer(godot::ModuleInitializationLevel p_level)
11{
12  // Check if we are in the level we want to initialize stuff in.
13  // This prevents multiple overlapping registrations and reference errors during initialization
14  // (like parent class missing if initialization is done in wrong level).
15  if (p_level == godot::MODULE_INITIALIZATION_LEVEL_SCENE)
16  {
17    // Handle initialization, register our test class to the engine.
18    godot::ClassDB::register_class<gdextension_test::TestNode2D>();
19  }
20}
21
22// This function will be called to uninitialize types and other things the extension provided.
23// It can be called multiple times, since the only the minimum initialization level is provided (see below the main entry point.)
24void terminator(godot::ModuleInitializationLevel p_level)
25{
26  // Check if we are in the level we want to uninitialize stuff in.
27  if (p_level == godot::MODULE_INITIALIZATION_LEVEL_SCENE)
28  {
29    // Handle uninitialization.
30  }
31}
32
33// Expose as unmangled C ABI.
34extern "C"
35{
36  // Entry point function. Name is important here since it needs to be both unique and defined in the GDExtension manifest.
37  GDNativeBool GDN_EXPORT gdextension_test_library_init(const GDNativeInterface *p_interface, const GDNativeExtensionClassLibraryPtr p_library, GDNativeInitialization *r_initialization)
38  {
39    // Create "InitObject" that contains all the necessary information how to initialize the extension.
40    godot::GDExtensionBinding::InitObject init_obj(p_interface, p_library, r_initialization);
41    // Set the initializer function for the extension. Can be a lambda.
42    init_obj.register_initializer(initializer);
43    // Set the terminator ("uninitializer") function for the extension. Can be a lambda.
44    init_obj.register_terminator(terminator);
45    // Set the minimum initialization level the above functions are called within.
46    init_obj.set_minimum_library_initialization_level(godot::MODULE_INITIALIZATION_LEVEL_SCENE);
47    return init_obj.init();
48  }
49}
gdextension.cpp
There. This should be all of the coding for the article. Next we will need to create a gdextension file to introduce our extension to Godot. This is Godot specific file and let’s go up one folder to “gdextension_test” and in there create the following file:
1[configuration]
2entry_symbol = "@GDEXTENSION_ENTRY_POINT@_library_init"
3
4[libraries]
5windows.64 = "@[email protected]"
gdextension.in
Notice the weird “@TARGET@” and “@GDEXTENSION_ENTRY_POINT@” words? Those are for our build tool to replace. Same goes for the file extension “.in” which is mostly used for build tool configuration in which build tool generates a file using the “.in” file as a template. And speaking of which: we have the code, now how do we build it?
Godot and its sub projects mainly use SCons as a build tool. It is quite popular and available for almost any relevant platform. It is Python programming language based and because of that, it can contain quite complex build scripts that use Python provided functionality. Here however we will use CMake. Some sub projects (like godot-cpp) supports CMake so we don’t have to modify any Godot specific code.
Author's Note
It has been awhile since I have used SCons but I regularly use CMake because it is used just about everywhere. This is the main reason we will use CMake here since I’d need to study SCons more to actually write about it confidently.
CMake has its warts compared to SCons such as not having a proper scripting support (yes yes, you can script it but comparing it to a beast like Python is quite unfair) resulting in lots of platform specific custom commands if you are doing something more complex.
On the other hand CMake usually is less verbose than SCons and has a solid support for multiple compiler frameworks (“kits”), project generators and external libraries. The way CMake exposes these external libraries and their includes, import libraries and so on make it really a breeze to work with.
Let’s stay in the “gdextension_test” folder and create the following build script :
 1# Setup requirement for this build file.
 2CMAKE_MINIMUM_REQUIRED(VERSION 3.23 FATAL_ERROR)
 3# Setup project name.
 4PROJECT(gdextension_test)
 5# Calculate target bit count if not given.
 6# This is also used in GDExtension platform specifiers due to the possibility of
 7# having separate builds for multiple different platforms.
 8IF (NOT DEFINED BITS)
 9  MATH(EXPR BITS "8*${CMAKE_SIZEOF_VOID_P}")
10ENDIF()
11# Set TARGET variable so we don't need to use the monstrosity below repeatedly.
12SET(TARGET ${PROJECT_NAME}.${CMAKE_SYSTEM_NAME}.${CMAKE_BUILD_TYPE}.${BITS})
13# Make it lower case.
14STRING(TOLOWER ${TARGET} TARGET)
15# Find all cpp files and put those in SOURCES variable.
16FILE(GLOB_RECURSE SOURCES src/*.c**)
17# Create build target from the name and sources we setup above.
18ADD_LIBRARY(${TARGET} SHARED ${SOURCES})
19# Add godot::cpp as private dependency.
20TARGET_LINK_LIBRARIES(${TARGET} PRIVATE godot::cpp)
21# If we are using Visual Studio compiler, add some options.
22IF("${CMAKE_CXX_COMPILER_ID}" STREQUAL "MSVC")
23  # Enable C++17 support.
24  TARGET_COMPILE_OPTIONS(${TARGET} PRIVATE /std:c++17)
25  IF(CMAKE_BUILD_TYPE MATCHES DEBUG)
26    # If target is debug build, setup proper runtime library (mainly to match godot-cpp one).
27    SET(CMAKE_MSVC_RUNTIME_LIBRARY "MultiThreaded$<$<CONFIG:Debug>:Debug>DLL")
28  ENDIF(CMAKE_BUILD_TYPE MATCHES DEBUG)
29ENDIF()
30# Create a proper GDExtension configuration filename.
31STRING(TOLOWER "${PROJECT_NAME}.gdextension" GDEXTENSION_CONFIGURATION_FILE)
32# Create entry point name from project name.
33STRING(TOLOWER ${PROJECT_NAME} GDEXTENSION_ENTRY_POINT)
34# Create GDExtension configuration file from our configuration template.
35CONFIGURE_FILE(gdextension.in ${GDEXTENSION_CONFIGURATION_FILE})
36# Specify runtime installation target (this is the actual library).
37INSTALL(TARGETS ${TARGET} CONFIGURATIONS Debug RUNTIME DESTINATION ${PROJECT_NAME})
38# Specify files installation target (this is the configuration file).
39INSTALL(FILES "${CMAKE_CURRENT_BINARY_DIR}/${GDEXTENSION_CONFIGURATION_FILE}" CONFIGURATIONS Release Debug DESTINATION ${PROJECT_NAME})
CMakeLists.txt
Author's Note
This build script is made only for debug builds. Release builds may have more specific configuration both related to its dependencies and the library itself. I will not go through the release build here since it usually is highly project dependent.
If we were to issue build command here we would get all sorts of errors related to not finding godot_cpp dependency. As such we will need to create a multi-project build script that our extension is only a part of.
Project root folder
Go up one folder to get to the root folder of project.
Add another build script here :
1# Setup requirement for this build file.
2CMAKE_MINIMUM_REQUIRED(VERSION 3.23 FATAL_ERROR)
3# Setup project name.
4PROJECT(HowToStartMakingGDExtensionsForGodot)
5# Add godot-cpp as part of this multi-project build.
6ADD_SUBDIRECTORY(external/godot-cpp)
7# Add the extension as part of this multi-project build.
8ADD_SUBDIRECTORY(gdextension_test)
CMakeLists.txt
As you can see, here we add both the godot-cpp project and our extension as part of this root build script. Both of these folders have their own “CMakeLists.txt” files that handle their own build process while inheriting the settings set to this root build script and still injecting themselves into the build process. As an example, CMake knows that “gdextension_test” is dependent of “godot::cpp” namespace that the “godot_cpp” project introduces so it knows it needs to be built before.
Now we are close to actually building the whole shenanigans but in order to make the building easier, lets create a Visual Studio CMake configuration file to handle the build process and correct installation direction inside our Godot project. Still remaining at the root of the whole project, create the following file :
 1{
 2  "configurations": [
 3    {
 4      "name": "x64-Debug",
 5      "generator": "Ninja",
 6      "configurationType": "Debug",
 7      "inheritEnvironments": [ "msvc_x64_x64" ],
 8      "buildRoot": "${projectDir}\\out\\build\\${name}",
 9      "installRoot": "${projectDir}\\game\\extensions",
10      "cmakeCommandArgs": "",
11      "buildCommandArgs": "",
12      "ctestCommandArgs": ""
13    }
14  ]
15}
CMakeSettings.json
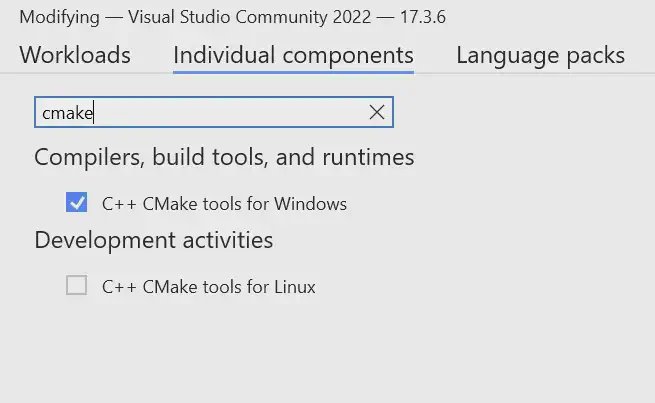
Build
Before starting the actual Visual Studio, start Visual Studio installer, and make sure you have CMake tools installed in the “Invidual components” section :
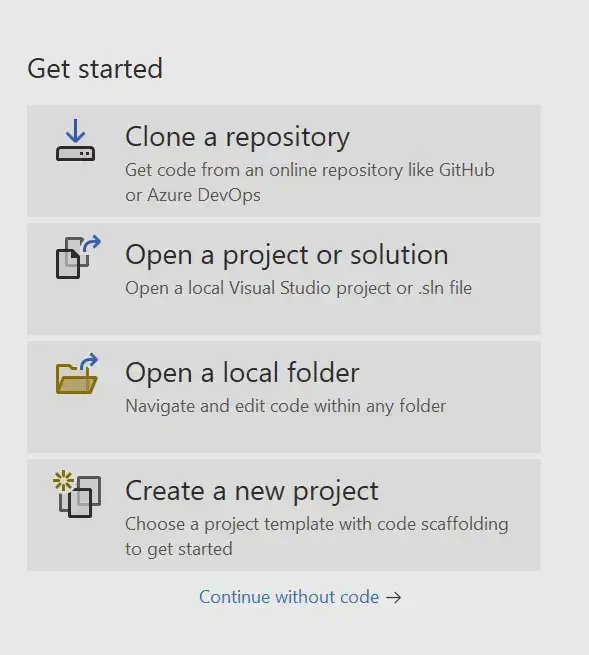
Next start Visual Studio and open the project root with “Open a local folder” option :
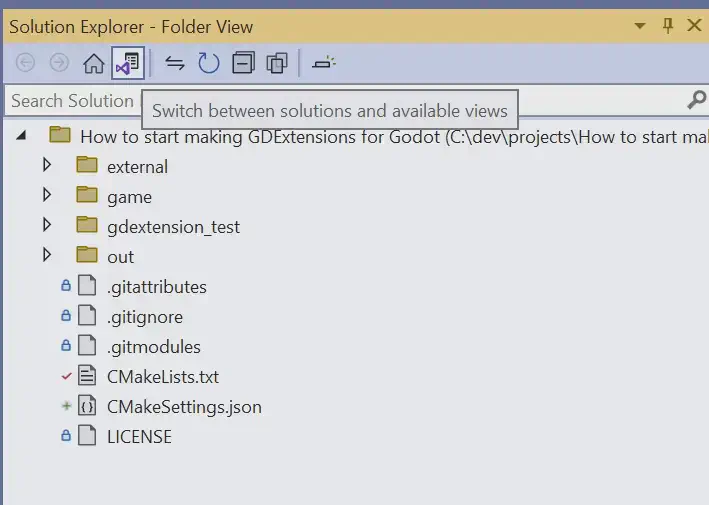
Then on the solution explorer click on the following :
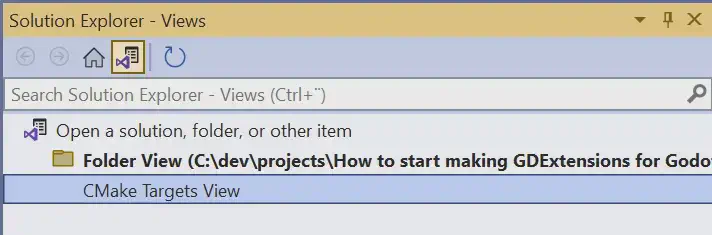
Then double click on “CMake Targets View”:
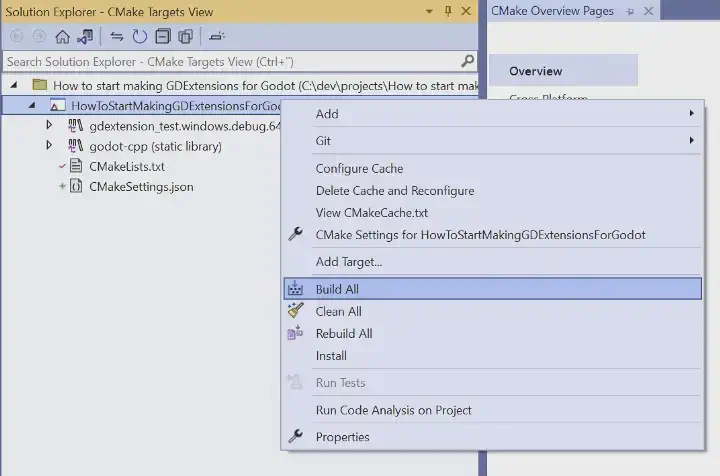
In here we can right click on the “HowToStartMakingGDExtensionsForGodot” and click “Build All”.
When first issuing this command it will take some time to build. Majority of the time is spent on building godot-cpp project and only fraction is spent on building the actual extension. Worry not, whole rebuild of the godot-cpp dependency is rarely needed and the following builds issued only builds your extension and even parts of that are cached as well.
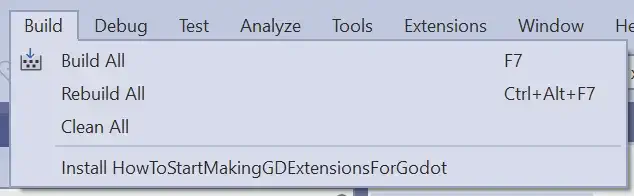
After the build, you still need to install the extension. From the “Build” menu on top, select “Install HowToStartMakingGDExtensionsForGodot” :
Now you can check the “extensions” folder under the “game” folder and it should show something like :

And inside that “gdextension_test” folder you should find :
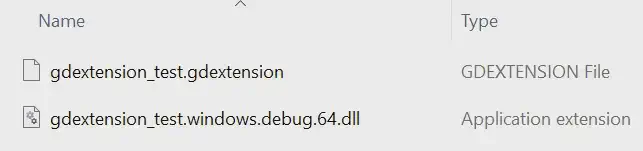
Phew!
Testing
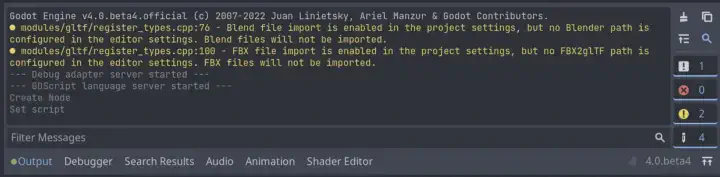
Now that we have the extension built, let’s test it. Fire up Godot again and open the project inside “game” folder. If all is well the debug console should not contain any errors. Or if there were any errors they should not be related to our extension :

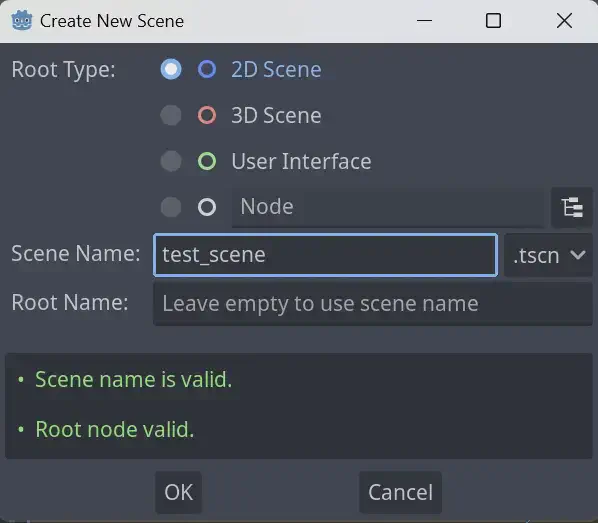
Now create a new 2d scene :
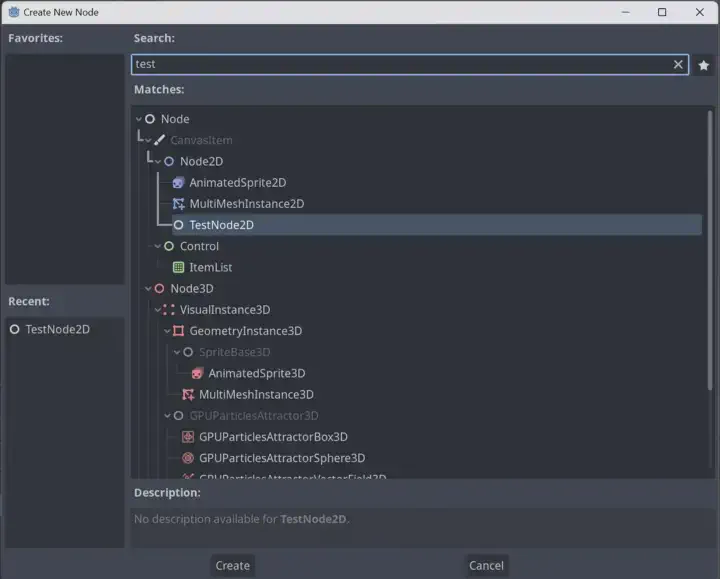
Add our node to the root by searching it :
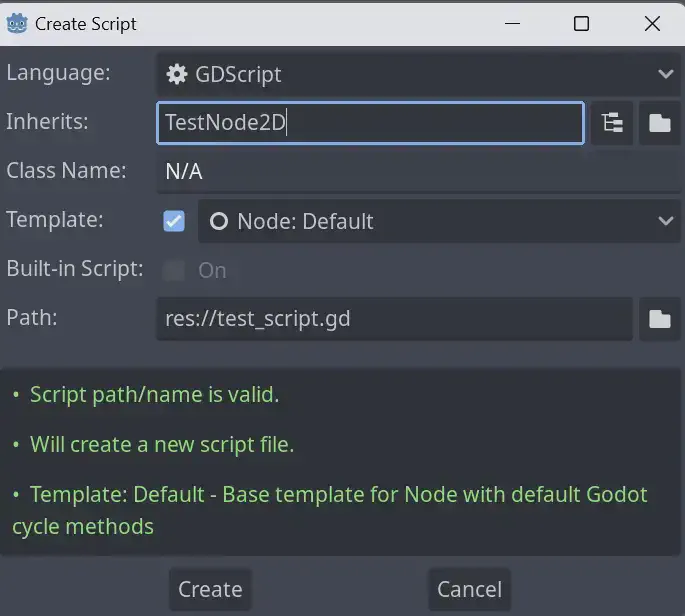
Create a new script that derives from TestNode2D :
Open the newly created test script and add call to our native method :
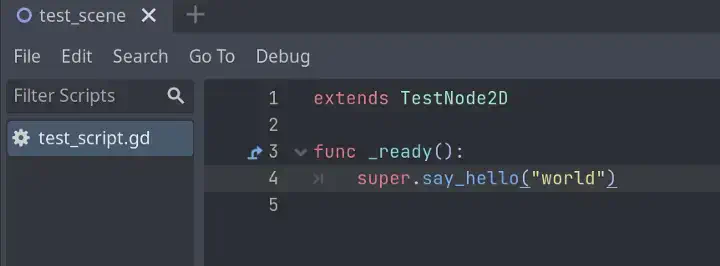
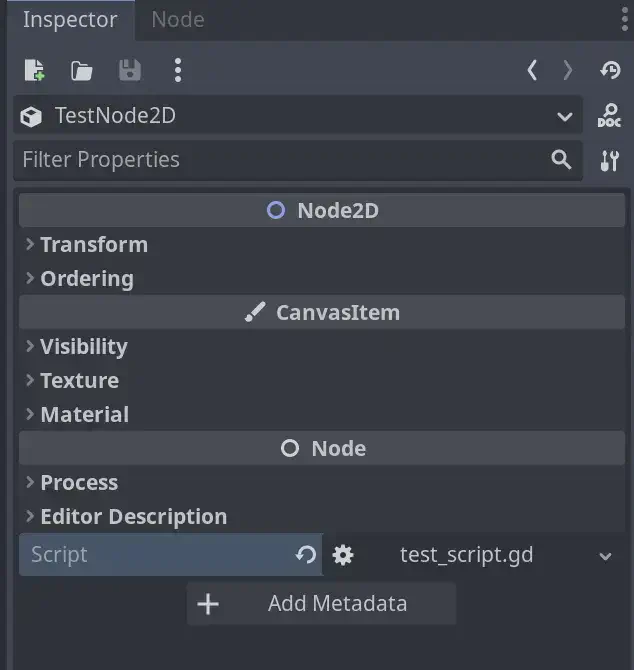
Assign the test script to our newly created TestNode2D node :
Make sure both script and scene are saved. Expand “Output” tab so you can see engine logs :
Run the project and You should see print from native code (the engine might notify that You don’t have start up scene set up, just instruct it to use the current one) :
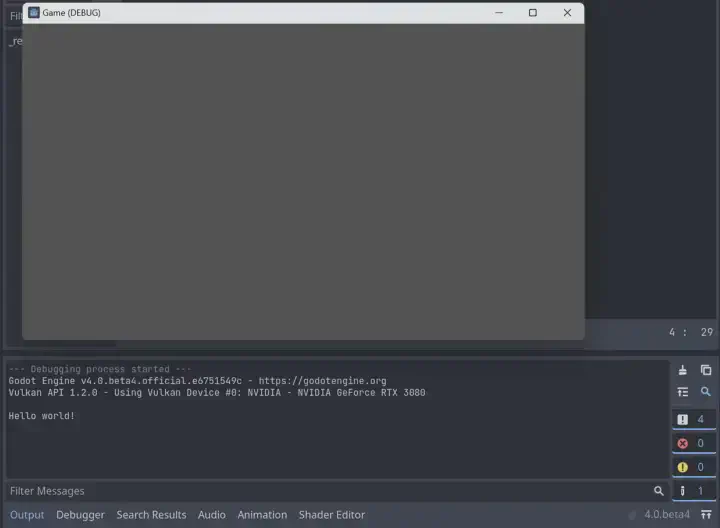
It’s alive!
Debug
First we need to configure how to start the debugging process from Visual Studio. We cannot directly attach the debugger to the editor, since the editor will spawn different engine process to play the game and the scene and our debugger is not wise enough to attach to that sub process. This means we need to create a separate debugging configuration that will start our scene we wish to debug and attach the debugger to that one.
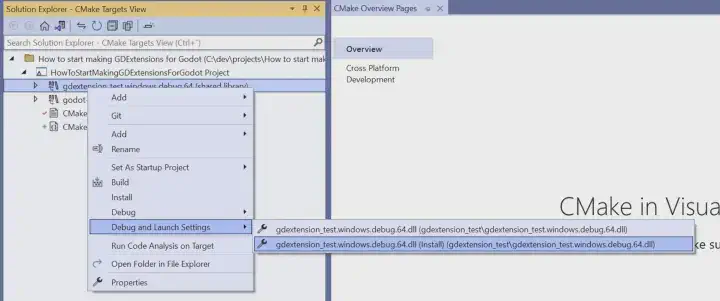
From the CMake Targets View right click on the “gdextension_test.windows.debug.64”, select “Debug and Launch Settings” and pick the one that has (Install) on it :
This will open JSON editor and You need to adjust the following template from Your own setup :
 1{
 2  "version": "0.2.1",
 3  "defaults": {},
 4  "configurations": [
 5    {
 6      "type": "dll",
 7      "exe": "<path to Godot editor exe>",
 8      "args": [ "test_scene.tscn" ],
 9      "project": "CMakeLists.txt",
10      "currentDir": "<path to the game folder inside the extension project>",
11      "projectTarget": "gdextension_test.windows.debug.64.dll (Install) (gdextension_test\\gdextension_test.windows.debug.64.dll)",
12      "name": "Debug scene"
13    }
14  ]
15}
launch.vs.json
For example my JSON looks like this :
 1{
 2  "version": "0.2.1",
 3  "defaults": {},
 4  "configurations": [
 5    {
 6      "type": "dll",
 7      "exe": "C:\\dev\\sdk\\godot\\Godot_v4.0-beta4_win64.exe",
 8      "args": [ "test_scene.tscn" ],
 9      "project": "CMakeLists.txt",
10      "currentDir": "C:\\dev\\projects\\How to start making GDExtensions for Godot\\game",
11      "projectTarget": "gdextension_test.windows.debug.64.dll (Install) (gdextension_test\\gdextension_test.windows.debug.64.dll)",
12      "name": "Debug scene"
13    }
14  ]
15}
launch.vs.json
Author's Note
I had few problems starting the scene with full path without setting the working directory (“currentDir” here). It might be because I have spaces in the path or it might be a bug in Godot 4.0 beta. Either way this works so let’s use the above for now.
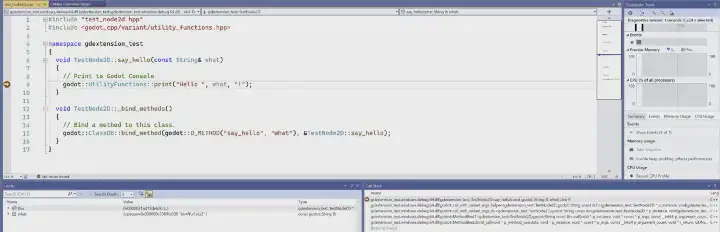
Now go and put a breakpoint in the “test_node2d.cpp” file like this :
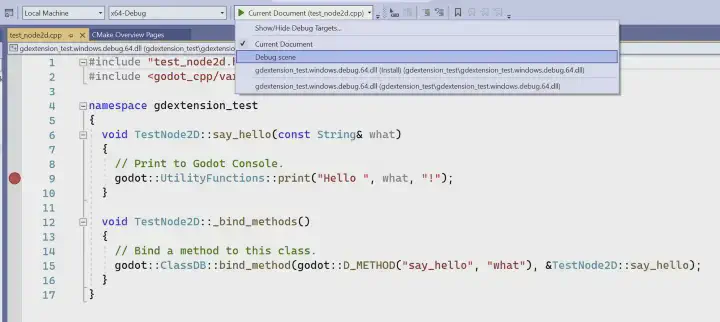
From the upper start menu select “Debug scene” and press the play button :
Voilà! It should break at the correct position :
Further studying
Now this will get you started on the journey of native extensions for Godot. Still many questions remain that I have yet to get answers to myself. I plan to address hopefully some of them in the future and maybe write about them if people show interest — do You have a topic concerning Godot You’d like for me to write about, please tell me in the comments. Here are some of the things I’d like to get back to at some point.
Static linking in GDExtensions
Some of the platforms like HTML5/WASM, IOS and presumably some of the consoles cannot use dynamically linked libraries. I presume Godot team has thought of this that we can use GDExtensions in those as well. GDExtension configuration files can point to statically linked “.a” libraries as well and I think using the project export functionality will create some form of “extension loader” that invokes entry points in statically linked environments during engine startup.
Author's Note
Briefly checking Godot engine platform export source codes, it seems that this is the case at least for IOS as the “.a” libraries are presumed to be linked and it indeed generates some form of initializer code for it.
WASM on the other hand seems to use Emscripten’s dynamic linking capability although this is deemed bad for performance. Maybe WASM could utilize the same method as IOS so it does not need to resolve in dynamic loading not yet supported fully in WASM.
More testing is needed to check how it works under the hood.
Unit testing
Unreal Engine has a form of smaller unit testing capability built inside the editor. Godot seems to have some form of unit testing but it is only on the native side. While this is still better than nothing, GDScript could need same kind of love to enable unit tests (it has “annotations” so maybe via those?). Especially when project grows larger and in “corporate” world with larger teams.
GDExtension development process
There are some pain points in the whole process with developing GDExtensions with native code. I am not sure if this is a problem with other platforms but at least with Windows there are file locking problems that prevent a smooth development iteration. Each change in extension requires editor restart to unlock the previously loaded version before installing the new version. This undermines the GDNative versus GDExtension benefit of dynamically loading extensions.
Git repository
Above article has a public Git repository for You to fork and study, it can be found here.
Epilogue
Thank You for reading this article. Personally, this was first ever written article/tutorial outside my day job. Hopefully you enjoyed it and follows, mentions, comments, sponsoring and so on are more than welcome so I can get a bit of feedback and maybe continue writing these 😊 Maybe I could commit something back to main Godot project too at some point however I must confess I have not contributed that much to open source projects. I hope this will change. Nothing related to open source generally, just time constraints have prevented me to invest time in making patches and articles “good enough” for public release.Author's Note